How to turn on wifi on an Acer laptop: setting up the connection correctly. How to set up WIFI on a laptop? The correct method! Which button to turn on Wi-Fi
Lenovo laptops are not particularly fussy when it comes to wireless connections, but sometimes you have to work hard to turn on Wi-Fi on a Lenovo laptop. Especially if it is not a very new laptop model, and Windows 7 or Windows 8 (or even XP) is installed on it. In Windows 10, everything is somehow simpler. Although, after installing Windows 10, I couldn’t turn on Wi-Fi on my laptop. I wrote about this in one of the articles on the site. But the problem was solved quite quickly. I will also write about this in the article.
Of course, depending on the laptop model, the installed operating system and different settings, the reasons may be different. But as personal experience and information that is often shared with me in the comments show, most often a Lenovo laptop cannot connect to Wi-Fi due to the fact that it is turned off by a switch on the laptop body or a key combination on the keyboard. Therefore, we will consider these two methods first. And of course, very often the wireless module driver is simply not installed on the laptop.
Let's go in order:
1 If you have a wireless network icon with an asterisk in your tray, this means that everything is fine. Click on it, select the desired network and connect. 2 If there is no Wi-Fi icon there at all, but instead a “network connection” (Ethernet) icon, then I’m almost sure that your Lenovo laptop does not have a Wi-Fi driver installed. This is what the icon looks like:And in the Device Manager, on the "Network Adapters" tab, you will not see a wireless adapter (Wireless, WLAN).

In this case, you need to download and install the required driver. I already wrote about this in a separate article: .
3 Well, the third option, which this article is devoted to, is when there is a Wi-Fi adapter, everything seems to be working, but the Wi-Fi icon with a red cross and the status, or “Wireless network - Disabled”.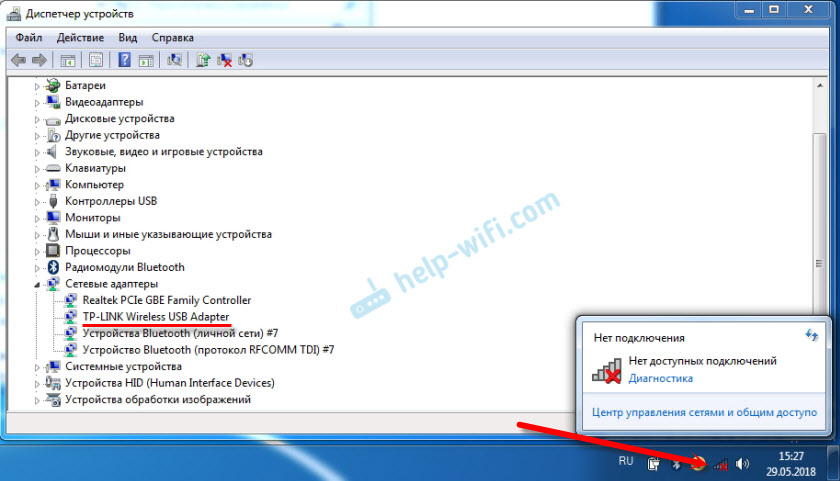
In my case, in Windows 10 the Wi-Fi button was simply grayed out. And the wireless network switch in the settings did not work. I wrote about this in an article. There I just encountered this problem on a Lenovo laptop.
If you have the same case, you cannot turn on the wireless network on your laptop, then look and apply the solutions from this article.
Mechanical Wi-Fi switch
Many Lenovo laptop models have a separate switch that is designed to disable and enable the wireless connection. You need to check if there is such a switch on your laptop. Maybe you or someone else accidentally turned it to the "Off" position. Therefore, wireless communication is disabled.
Most often it is located on the front of the laptop. Maybe the assembly, or somewhere near the keyboard. There should be a wireless network icon next to the switch.

If your laptop has such a switch, make sure it is in the "On" position. If everything is turned on there, then turn it off and turn it on again.
You can also reboot your laptop. If the laptop does not see wireless networks immediately after using a special switch.
Fn key combination on Lenovo laptop to turn on Wi-Fi
On new models on which the manufacturer recommends installing Windows 10, the keyboard shortcut Fn+F7 (with airplane icon) serves to turn it on and off. But it is possible that using this key combination in some cases you can also turn on Wi-Fi.

The keyboard shortcut is also common Fn+F5 (with wireless network icon).

Basically, Lenovo laptops use the key combination Fn + F7, or Fn + F5. I haven't met any others.
Press these keys together once and look at the result. If nothing happens, then click on them and restart the laptop.
Why don't the function keys work?
It happens that the wireless connection on a Lenovo laptop is actually disabled using the function keys. Windows (after running diagnostics) tells us to use the keys or switch to turn it on.
But there is no separate switch, and the function keys do not function due to the lack of a driver or utility that is responsible for the operation of these function keys. Including Fn + F7 and Fn + F5.
This means that we need to download and install the utility from the Lenovo website, specifically for our laptop and the system installed on it. Most likely this is the Hotkey Features Integration utility, which can be downloaded from this link: https://support.lenovo.com/ua/ru/downloads/ds014985. This is for Windows 8, Windows 7 and Windows XP.
And if you have Windows 10, then most likely you need the Lenovo Utility for Windows 10 utility. It can be downloaded on the page of your specific laptop model.
After installing the utility, restart your laptop and try using the function keys.
Software method (in Windows settings)
Try using Windows Mobility Center. To call it, press the Win + X key combination.
There may be a "Turn on wireless" button.

If it is there and active, then after pressing Wi-Fi should work.
In Windows 10, you can open this window through search.

But on my Windows 10 laptop there is no wireless control in this window. Therefore, go to the settings, to the “Network and Internet” section and on the Wi-Fi tab, try to turn it on.
I think these tips are enough. If you know other ways in which you can enable Wi-Fi on a Lenovo laptop, then write in the comments.
If nothing from the article helped, then check the function keys again. Especially if you have Windows 8 and below. Download and install the Hotkey Features Integration utility, which I wrote about above.
There is a built-in connector that connects to Wi-Fi. But what to do if, after turning on a brand new laptop with an operating system installed on it, connecting to the router to receive communication does not work? You need to “rummage through” the settings by connecting Wi-Fi itself. We will look at classic methods for checking the ability of an adapter built into a laptop to connect and present methods that help you change Wi-Fi parameters and configure it in versions of Windows 7-10.
We enable Wi-Fi in the laptop by hardware
Hardware-type tools will help you enable the connection. To do this, you should use buttons designed for connecting to wi-fi - this is the simplest option. If it doesn’t work, it’s worth checking to see if the driver on the laptop has failed.
Turn on wireless connections using laptop buttons
Some versions of equipment equipped with an element that makes it possible to use wi-fi require its separate activation: not every device automatically starts a wireless network. Some devices require the use of two keyboard buttons, some are equipped with one key for adapter launch. On older versions of laptops there is an independent button on the body, and not on the keyboard, made in the form of a slider.
If the user examined the laptop's casing but did not find a stand-alone slider, he should. As a rule, to turn on the transmitter, allowing you to join a wireless type of network, use the function buttons F (from the first to the twelfth).
You need to look at the symbols drawn on these keys. One of these keyboard elements has a Wi-Fi icon embossed in the form of an antenna.
Important: To connect to the Internet, which is a wireless type, the Fn+F5 combination is often used, so you should first look at these keyboard elements.
Checking and installing drivers for Wi-Fi
If the methods described above failed to enable an element designed to connect to a network wirelessly, the adapter may have been disabled by software - it was disabled in the operating system options. The user can launch the adapter using the classic Windows settings using two methods.
Method 1
This method involves using a center designed to manage network access. To start the device that connects the laptop to Wi-Fi, the user should use the combination Win + R, and then, when the window opens, type “ncpa.cpl”.

This request will bring up a section that allows you to change connector parameters.
Attention! In older XP versions, this item is indicated differently: you will need to find a section for a network type connection.
In the section, the user needs to find a column/option that provides information about the connection to the network, which is a wireless type. If this column is gray, the element connecting to WiFi is turned off. To start its operation, you need to click the button on the right and assign the option to be enabled. After this, you should try to connect to an available network.
Method 2
This method involves using a manager, which is designed to monitor the operation of devices. In the manager, connectors are disabled infrequently: usually the termination of the connector’s functioning is caused by a malfunction of the laptop (especially inexpensive but convenient models like).
Important: If the Wi-Fi connector built into the laptop is turned off, then in the graph displaying connections related to the network type, the icon corresponding to wireless connectors will not be visible.
To enter the dispatcher, the user should press Win + R on the keyboard that is built into his laptop. In the window that opens, to execute it, you need to enter devmgmt.msc and confirm the request.
When the dispatch window opens, in the column displaying adapters, look for the one whose name suggests “Wi-Fi” or “Wireless”.
Then you need to select the option in the menu that enables the connector: it is called up by right-clicking the touchpad on the device name.
Attention! If you get an error at startup, check the drivers: they will have to be reconnected, updated or reinstalled.
Additional method
Setting up WiFi on a laptop with Windows 10
Unlike the eighth option, the tenth (for example, ) does not have a panel that drops down on the right, namely, it cannot be “summoned” by clicking on the “network column” located in the system type tray (it is located next to the clock and date).
Because of this, users who used a different version of Windows may get confused when setting up Wi-fi. This is also due to the fact that in the tenth version of the operating system the user receives only a list of connections that are accessible to the connector built into the laptop and are within its accessible radius.
In order to correctly configure Wi-Fi in the tenth version of the operating system created by Microsoft, and not mess up other settings, the first thing you should do is find a shortcut in the system tray. The icon will display a list of those networks that are open for connection.

Attention!If after clicking on the network list icon is not visible, click on the line that can show available connections. After the user clicks on the inscription, a panel will appear on the right.
When the network is found, click on it: if it is protected, enter the password and confirm. After this, a message indicating a successful connection will appear. In order not to enter the password every time, you should tinker a little with the settings.
Select the option that gives access to additional options. When the window opens, click on the section leading to the center, which is intended to indicate grid parameters. Find the connection in the center, click on it and select the option that leads to its network properties.
Important: After completing the steps, you should note those functions that the user considers necessary in order to work comfortably with Wi-Fi.
Thus, the user is free to connect to any non-password-protected network visible to the device. This column is located in a tab designed to control connections that are of the wireless variety.
Also, the owner of a laptop that runs on “ten” has the opportunity to open automatically triggered access for . This section is located in the tab that displays network connectors.
To start automatic access, the laptop user will need to click on the section for network connections, go to properties and check the corresponding box.
Interesting:The same column displays other options regarding network settings.
In the center, where it is possible to work with connected network devices, the laptop user has the opportunity to program the router and “create” a new connection, which belongs to the category of those that connect wirelessly. There you can also set up a network VPN designed for accessing work data from a distance.
The user can also create a local group and enable/disable the Firewall.

Setting up Wi-Fi on Windows 8-8.1
To make the settings on a laptop that runs on the eighth version of Windows (for example), you need to find the network shortcut in the tray and click on it using the left button of the touchpad (a double short press on the paddle built into the laptop will also work).
This action will “announce” the list of connections available for the laptop connector, which belong to the wireless variety. Afterwards, you need to click on the Hotspot to which the user wants to connect, and then confirm the action by clicking on the line with the same name. A field will appear in which you need to enter a password that gives access to the network point.
Attention! In order for the laptop user to be able to see the text of the password that he wrote, he will need to click on the icon made in the form of an eye, which is located on the right side of the field. It should be remembered that the printed text is visible only if you “pinch” your “eye”.

When the password is printed, the user will need to click on “next”. If the password characters are entered correctly, the connection will be established in a maximum of a minute. Connecting to the network takes longer only when the Internet is slow.
A sign that everything is connected is the changed appearance of the network shortcut, which is located in the tray. It’s convenient that Windows 8 (for example,) sets all the configurable parameters that are necessary for a new connection “automatically,” excluding the password.
When the system comes online, it will “ask” you to determine the network type. The request concerns whether the user wants a printer or other peripheral device to be connected immediately, without requesting access. The user will also need to indicate whether he wants the information on his laptop to be available to others.
Attention! If you click “yes,” then information exchange between connected PCs and MFPs (wireless printing) will be available on the network under the user-selected name. It's convenient for the office. If you click on “no”, the network will only work with the Internet.
Changing indicators
All in the same tray, on the “network” shortcut, you need to use the right key of the touchpad, and in the optional window that pops up, click on the section, which is the center that allows you to interact with network settings.
In the center you will need to find the name of the “hotspot” and click on it to bring up an option displaying its status. In this window, click on properties related to the network connection. There you need to check the necessary boxes regarding the settings.
The presence of Wi-Fi makes it possible to use the Internet in a variety of places. But before you can comfortably sit in a cafe or on a park bench and plunge into the world of the Internet, you need to figure out your laptop and find out how and where to turn on the network on your laptop.
How to enable a wireless network on a laptop?
There is nothing difficult about enabling wireless communication on a laptop. You just need to know the function keys to enable wireless communication on your brand of laptop, because each manufacturer uses key combinations in its own way. For those trying to understand:
- how to enable wireless communication on an Asus laptop, you just need to press Fn and F2;
- the wireless button on an HP laptop is a combination of Fn and F12 or a touch button with an antenna pattern in those models that have one;
- on Lenovo press Fn and F5 or a special switch, which is indicated in the instructions;
- Acer and Packard Bell turn on the network with a combination of Fn and F3;
- on different Samsung models it is either Fn and F9 or Fn and F12.
If the standard combinations are not suitable (a different one may be introduced in new models), then you should pay attention to the instructions from the manufacturer, which must indicate all the necessary information related to the functionality of the laptop. In any case, this should be the Fn button, and in its absence, press a special button with an antenna pattern or a switch.

Other ways to enable wireless connectivity on your laptop
If the switch is not marked on the keyboard, it can be placed on the side panel or bottom of the laptop. The buttons located on the bottom are made inconspicuous, so you need to pay special attention to find them there. If neither the combination nor the switch could turn on the wireless network, then most likely Wi-Fi is simply not configured, and it’s time to do it.

How to enable the wireless network adapter?
Any setup begins with checking the availability of the necessary drivers, which are connected if they are present, but not connected, and first downloaded and installed, and then connected if they are not in the laptop. You can check the drivers through the “Control Panel”, the “Device Manager” menu item. If this subsection is not immediately visible, it may be under the Hardware and Sound section.
From the “Dispatcher” you need to go to “Network Adapters” and find the Wireless section there, which is what you need. It may be that there is no inscription, or it is marked with an exclamation mark. This is direct evidence of problems with drivers that will have to be installed first. They must be present on the disk that came with the laptop. If the disk is lost or for some reason the installation fails, you can search for them on the manufacturer’s website.
If there are drivers, but they are marked with an exclamation mark, then you need to right-click on this icon and select the appropriate item in the menu that appears. Usually the phrase is “Engage.” You may additionally need to turn it on if the adapter is connected to power saving mode.
You can eliminate the saving factor in the Windows 7 menu in the “Properties” section, where there should be a “Power Management” subsection. There is a checkmark in the “Allow shutdown to save money” option.
After unchecking the box, the drivers will work and the connection can be made using a standard keystroke. If the above manipulations do not bring results, the laptop needs to be shown to a specialist - it may be damaged.

Every Lenovo, Asus, Acer, HP, Samsung, Toshiba, DNS, Dell or MSI laptop has a wifi function - you just need to turn it on to start using it.
Through Wi-Fi you can use the Internet, which has conquered our lives. He is with us at work, at school, in entertainment and in communication with friends.
The Internet has become a virtual reflection of everyday reality and an increasing number of people cannot imagine their lives without it - only first you must launch it.
What do you do when the hardware refuses to cooperate and the network is not available or worse, you have no idea how to connect Wi-Fi on your laptop?
To help you find a solution to this problem, below you will find a guide on the simplest ways to enable wireless connection and setup.
This is a step-by-step instruction for Windows 7 and 8 - now hardly anyone uses old Microsoft systems.
Check the function keys or how to turn on Wi-Fi on your laptop
I am fully aware that lack of sufficient knowledge is a serious problem, however, often the solution is simpler than you initially think.
So don't panic and read on calmly. Every laptop purchased over the past 5 years has a set of function keys.
They are used for volume control, media pause, screen saver, touchpad lock, etc.
Among them there are also those responsible for enabling/disabling the wireless wifi network.
By default, they are usually assigned to the F2 button - just press the Fn + F2 key combination, if these do not work on your laptop, then the WLAN control can be assigned to another button.
The simplest methods are usually the most effective - but if the keyboard shortcut above doesn't produce any results, move on to further reading
How to enable WiFi on your Windows 7 laptop
Windows 7 has been the main system pre-installed on most laptop manufacturers for the past few years—and it's likely on yours, too.
Below are the steps to help you learn how to enable Wi-Fi on your laptop - "on the seven"
- Go to Control Panel

Just click on it to see a list of all available wireless networks in your area. From the drop-down list, select the network you want to connect to.
How to enable WiFi on your Windows 8 (8.1) laptop
In addition to Windows 7, another popular system comes pre-installed on most new laptops: Windows 8 or 8.1.
Since its interface has been significantly changed due to the “metro” steps for it, turning on WiFi on a laptop is slightly different.
- Enable network settings
Move your cursor to the bottom right edge and click on the icon: “Settings”. I have Windows 8 in English, so your inscriptions will be different than in the pictures - in Russian.

- Go to your wireless network and turn on WiFi
When you are in the computer settings go to Wireless and change the wireless device from the Off position to the ON position.

Enabling Wi-Fi by laptop model
As mentioned above, some laptops may have “non-standard” settings.
Therefore, below I will give the most popular solutions for various models - I think this will be useful for many, especially if they do not have instructions from the manufacturer.
Please note that in addition to keyboard shortcuts, there may also be special buttons on the case.
How to enable wifi on acer
- Keyboard shortcut – Fn + F5
- Aspire 1000 / 1640Z / 1690 - button above the keyboard
- Aspire 16xx - button above the keyboard
- Aspire 2000 Series - switch on the front of the laptop
- Aspire 2012 Button - above the keyboard
- Aspire 3005 - switch on the right side of the laptop
- Aspire 3500 - on the front of the laptop
- Aspire 5610 - on the front of the laptop
- Aspire 5612 – laptop side button
- Aspire 9302 - blue button on the left side of the laptop
- Aspire 94xx - button below the lock key
- Aspire One [Older Models] - Antenna button in the lower right corner of the palm rest
- Aspire One [New Models] - Fn + F3 Keys
- Extensa 2000/2500 Series Button - button in the upper right corner of the keyboard
- Ferrari 3000/3020/3400/4000 - buttons on the front of the laptop
- Travelmate C Series Button - Top Left Key, Screen Menu will appear on the screen, select WLAN
How to enable wifi on asus
- Keyboard shortcut – Fn + F2
- One click: turn on Bluetooth / turn on Wifi
- Two presses: turn off Bluetooth / turn on WiFi
- Three presses: turn on Bluetooth / turn off WiFi
- Four presses: turn off Bluetooth / turn off WiFi
- Older models - [antenna icon] button above the keyboard, press and hold
- New models - bottom button to the left of the keyboard
- Compaq Armada - Enable Built-in Wireless
- Compaq Pavilion ZX5190 - [Wireless icon] switch on keyboard
- Compaq Presario - button on the back
- Compaq Presario CQ Series - (antenna icon) above keyboard
- Compaq Presario M2000 - (antenna icon) above keyboard
- 6910p - HP/Compaq button on the top left of the keyboard
- HP 600 – in the lower left corner of the keyboard
- HP nc4000/4010 - button above the keyboard
- HP NC4220 - on the left side of the laptop [near the USB Port]
- HP NC6000/6220 - above the keyboard
- NX9010 - on the front side of the laptop
- HP Omnibook 6200 - on the left side of the laptop
How to enable wifi on Dell
- In most cases, the keys are Fn + F2 or Fn + F8 or Fn + F12
- 600 m - Fn + F2
- E6400 - right side of laptop above headphone port
- Inspiron - FN+F2
- Inspiron 1510 / 500M / 600M / 1150 - FN + F2
- Inspiron 1505 - system tray icon right click and turn on
- Inspiron 1521 - right side of the laptop
- Inspiron 1525 - [wireless icon] button on the front of the laptop
- Inspiron 1720 - switch on the left side of the laptop
- Inspiron 5100 - Built-in Wireless Networking
- Inspiron 6000/8600/9300 - Fn + F2
- D400 / D500 / D600 / D610 / D400 / D500 / D600 / D610 / D620 / D800 - Fn + F2
- Latitude D630 (D640 and newer) - toggle switch on the left side of the front
- Latitude E6400 - FN+F2
- X300 - FN + F2
- Vostro 1500 - Large buttons on the left side of the back
How to enable wifi on Lenovo
- In DV series laptops there is a button in the form of an antenna above the keyboard
- R40 - Fn + F5
- Thinkpad - buttons on the left side of the laptop
- T43/X32 - Fn+F5 opens OSD menu, select "Turn On"
- X61 switch on the front right side of the laptop
- Lenovo T-61 – switch on the front of the laptop
How to enable wifi on MSI
- The button next to the power button
- U100 - Fn + F11
How to turn on wifi on Samsung
- Blue button in the middle of the keyboard
How to turn on wifi on Toshiba
- Keyboard - Fn + F5 or Fn + F8
- A100-078 – switch on the right side of the case
- Equium - on the front of the body
- Libretto – on the front of the body
- M1 and M2 – switch on the left side of the housing
- M40 and M70 – button on the front of the laptop
- Portege & Qosmio – on the left side of the case
- Quantium - on the left side of the laptop
- R100 – switch on the right side of the case
- Satego - on the right side of the laptop
- Satellite - switch to the lower left corner of the keyboard Fn + F8 shows the status
- L355D-S7825 - switch below the keyboard just to the left of center
- Satellite A60-S1662 - switch on the right side next to the USB port
- Satellite Pro button on side or front
- TE2000 - switch on the left side of the case
- Tecra 2100 – switch on the left side of the case
What to do if the instructions above did not help
If you have done everything written above and nothing helps, then the problem can only be one thing - the lack of the correct driver.
Where can I get the driver? It’s best to download it from the manufacturer’s website, but you can do it differently, especially if you can’t find it there.
The driver can be downloaded from . I won’t describe how to do this again - here are detailed instructions.
Very, very rarely there are situations when it is impossible to turn on Wi-Fi at all.
Yes, this is rare, but it happens - I’m not saying that the module failed, it’s just that the manufacturers themselves do not intentionally make mistakes.
Or, for example, you have an old laptop, you installed Windows 7 or 8 on it, but there may not be drivers for such OS on it, since the manufacturer has long forgotten about it. Let's hope that this is not your case and everything went well. Good luck.
Friends, you have a question: How do you turn on WIFI on your laptop? This question arises for many laptop users; it happens that turning on WIFI does not go so smoothly and creates a number of unforeseen problems. In this article we will look at options for enabling WIFI on different laptops.
See how to set up the Internet and set a WiFi password:
Usually, to turn on WIFI, you just need to press certain buttons on your laptop.
- On a laptop ASUS you need to press the button FN and press the button F2.
- On a laptop MSI WIFI turns on almost the same as on ASUS. Press and hold the button FN and press F10.
- Now let's move on to laptops Acer And Packard Bell. While holding the button FN click F3, thereby turning on WIFI.
- Most often on the manufacturer's laptop HP WIFI is turned on using a touch button with an antenna pattern. However, on some models of this manufacturer you need to hold FN and press the key F12. There are also models on which WIFI is turned on with a regular button with an image of an antenna.
- On a laptop Lenovo hold down the button FN and press F5. However, there are models (for example Lenovo IdeaPad z570) with a switch located on the side of the housing.
- On a laptop Samsung To turn on WIFI you need to hold down FN and press F9. On some models of this manufacturer, WIFI is turned on by holding down the keys FN And F12.
If your laptop has a button FN is missing, then only one specific button or switch is used to turn on WIFI. Finding this treasured button is not difficult; it will have one of the pictures presented below.
If there is no such button, examine the ends of the laptop and find a switch, which is also indicated by one of the images above or labeled Wireless or Wlan. Don't forget to look at the bottom of the laptop; some manufacturers hide the switch so that it becomes invisible and merges with the laptop body.
If the activation went smoothly, you can proceed to the process of connecting to WIFI.
WIFI does not turn on on laptop
It is not always possible to turn on WIFI using buttons or a switch. It is possible that when you press the power button, the wireless network will not work. The reason is that the laptop's wireless network adapter is disabled in Windows Device Manager. To enable it, go to Desktop, then hover your mouse over the icon My computer and press the right button, then click on menu Properties, then on device Manager.
Or go to the menu Start and point the arrow to My computer. Press the right mouse button and click on device Manager.

The image below shows device Manager with all devices installed on the computer. You need to find an item Network adapters and press the small triangle on the left. All network devices related to WiFi and the Internet will open, among them there will be a laptop adapter - you need to use it (turn it on). The name of your adapter may not match the name in the picture, since the adapter depends on the laptop model.
As you already noticed in the picture below, the top arrow points to the WIFI adapter. In my case, the adapter is installed on the laptop Atheros AR 9285 Warelles Network Adapter. If you do not have such lines in the device names from the section Network adapters, then look for devices with the presence of words Wirelles, Wlan or WiFi. Most often, these words appear in the name of wireless devices, which is what you need to enable.
To turn it on, move the mouse arrow over the wireless device and right-click, then click on the menu item Engage, thereby enabling WiFi on your laptop.

You may need to install a driver. Installing the driver for the WIFI adapter will be needed if you open the tab Network adapters and find an unknown device with a yellow triangle there. In this case, the network will not work without installing the WiFi driver.
Video of turning on WIFI on a laptop

